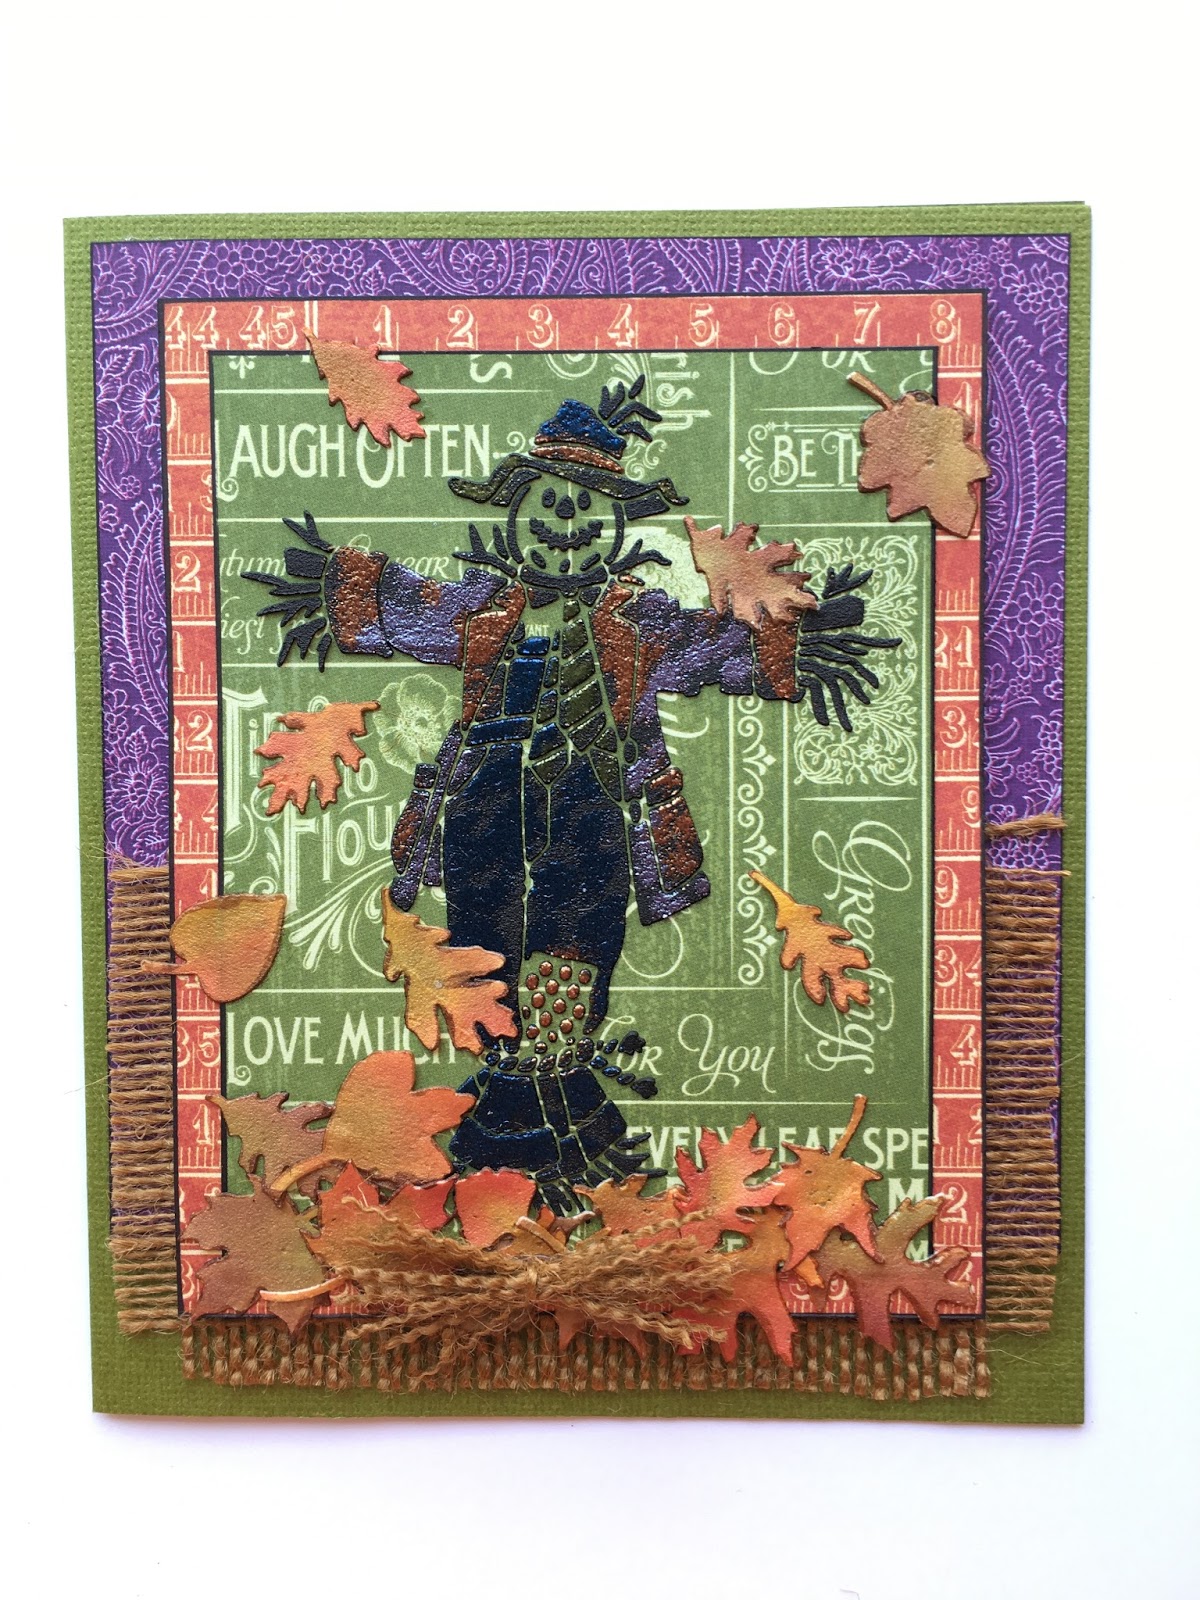
Today is Thursday, which means team members share ideas using stencils. Today I'm sharing a fun card using the Dreamweaver Scarecrow stencil, DWLG686. Check back tomorrow to see how I created the leaf embellishments!

Supplies:
Stampendous:
PK03 Gemstone Embossing Kit
EPA50 HT400 Embossing Tool
EPA50 HT400 Embossing Tool
Dreamweaver:
DWLG686 Scarecrow Stencil
DWLG616 Leaf Texture Stencil
DWDMBP Matte Black Embossing Paste
DWLG616 Leaf Texture Stencil
DWDMBP Matte Black Embossing Paste
DWDPK Dreamweaver Palette Knife
DWLM2010 Paste Spreader
DWLM2010 Paste Spreader
Plus:
My Color Cardstock - Spanish MossGraphic 45 November Flourish 4501050
Graphic 45 Charmed I'm Sure 4501143
Graphic 45 Brews and Potions 4501144
Brown Burlap
Copic Marker 100
Removable Tape
Foam Tape
Scotch Quick Dry Adhesive
Instructions:
Step 1: Fold a 6" x 10" piece of Spanish Moss cardstock in half to form side fold, 5" x 6" card (fits in an A7 envelope)
Step 2: Cut a 4 3/4" x 5" piece of the Brews and Potions paper (purple side), edge with 100, adhere to the card front near the top
Step 3: Cut a 2 3/4" x 4 3/4" piece of the brown burlap, fray the edges, adhere to the card front under the top paper
Step 2: Cut a 4 3/4" x 5" piece of the Brews and Potions paper (purple side), edge with 100, adhere to the card front near the top
Step 3: Cut a 2 3/4" x 4 3/4" piece of the brown burlap, fray the edges, adhere to the card front under the top paper
Step 4: Cut a 3 3/4" x 4 3/4" piece of the Charmed I'm Sure paper, edge with 100
Step 5: Tape the Scarecrow stencil to a 3 1/2" x 4 1/2" piece of November Flourish paper (green side) with removable tape
Step 6: Use a palette knife and paste spreader to apply Matte Black Embossing Paste over the design, remove stencil and place in water for cleaning later, let paste dry
Step 7: When the paste is dry, place the clean, dry Scarecrow stencil back over paste and use a finger dabber to apply VersaMark to the parts of the image where the "clothes" are, remove stencil, sprinkle various colors of embossing powder where desired, tap off extra, heat set, edge with the 100 marker
Step 8: Adhere the Scarecrow to the Charmed I'm Sure layer
Step 9: Use foam tape to add the Scarecrow to the card
Step 9: Use foam tape to add the Scarecrow to the card
Step 10: Use the Quick Dry to add some small pasted leaf embellishments (see separate instructions for DWLG616 Leaf Texture in tomorrow's post!) and a small bundle of the burlap tied together to finish the card
For more Fresh Fall Fun see:
Louise Healy
Happy Creating,
2 comments:
You have made me want the Scarecrow stencil!!! It is now at the top of my wish list! I am in love with your card!! The leaves floating around and the stunning scarecrow equal an awesome creation! TFS!
This is so pretty! I love how colorful this card is. Yay fall!
Post a Comment